A Small Opening
In this article we will first go through how to integrate your Objective-C code into your new Swift code, and then go on to explain the interoperability between Swift and Objective-C and to close it all we will talk about CocoaPods. That will help you to connect existing Objective-C (Cocoa) code and libraries to new Swift projects for iOS 7 and iOS 8 apps that will run on the iPhone 6 and other iOS devices.
Objective-C integration with Swift
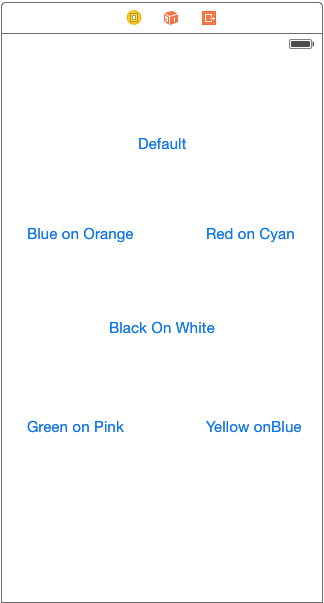
In the last WWDC among other stuff Apple announced their soon to be programming language Swift. After all the excitement that we all went through once we read/heard about the capabilities of Swift and after rushing and downloading Xcode 6 and iOS 8 to our computers and devices, we felt like our code is sad, alone and missing our good old libraries that we always counted on. So how do we actually use our good old libraries in our new Swift projects? For the next example we’ll create a sample app called “Colors”. The app will have one screen with six buttons whose names will be a color and its negative, for example : “black on white”, ”green on pink” etc. Once a certain button is clicked, the color and its negative will be applied to the color of the button and the view. Here comes the Objective-C code, the colors will be initiated through an Objective-C code that will take a string of a hex color and return a UIColor. Let’s begin!
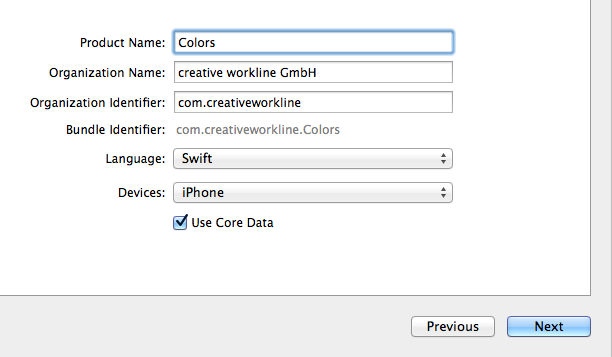
We create a simple view application project:
Our layout:
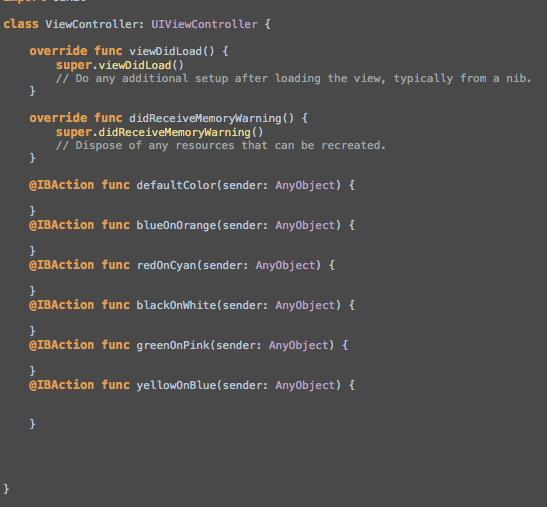
Make IBOutlet functions for all the buttons and connect them:
Now create a new group called “Utils” and a new file. Create a new Cocoa class file named ColorUtil, Xcode will ask you in what programming language you like the file to be in, Objective-C in this case of course. Once you click next Xcode will ask you if you would like it to create a bridging header.
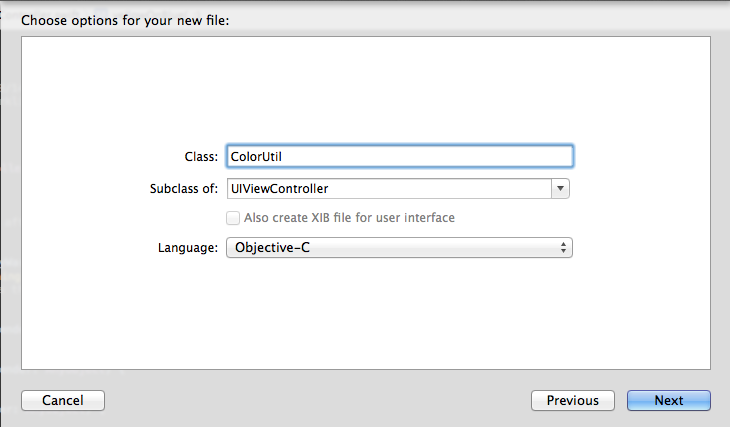
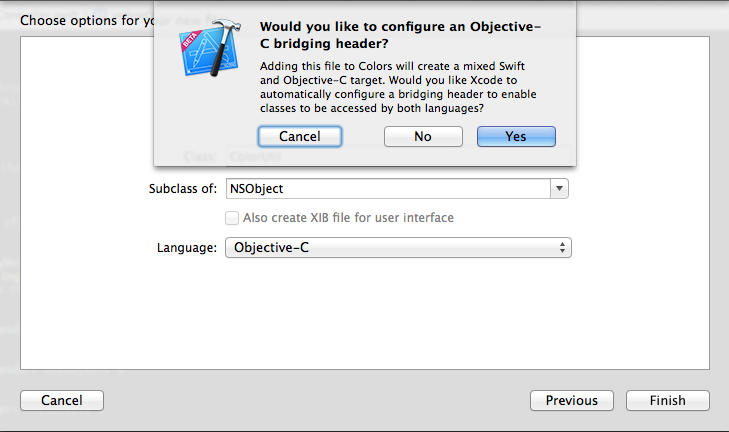
Once you click yes, three files will be created, your .h and .m file, and another .h file called YourProject-Bridging-Header.h . If however from some unknown reason Xcode does not create the bridging header automatically, you can always do it manually by creating a header file and setting it as the project’s Bridging header, which can be done through the project’s build settings:

Now All you have to do is to import your Objective-C code to the project and use the “#import” statement in the bridging header file to import your Objective-C classes:
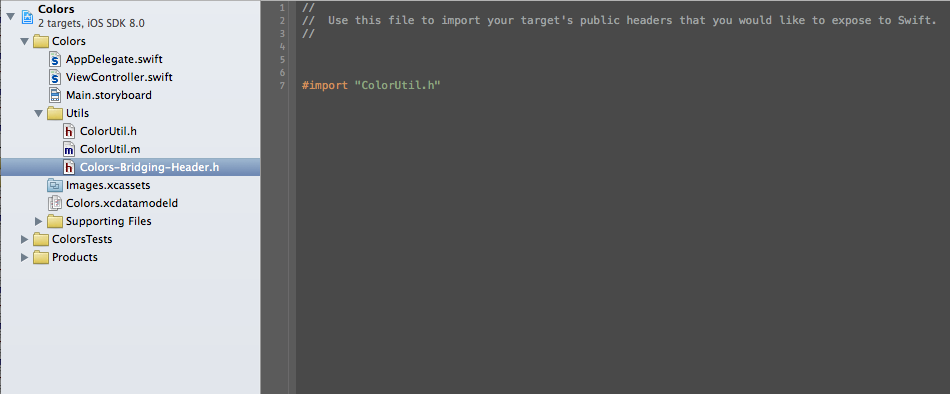
And that’s it! Once you import your Objective-C classes to the bridging header file, they become visible to the Swift compiler and can be used immediately in swift:

From Swift to Objective-C
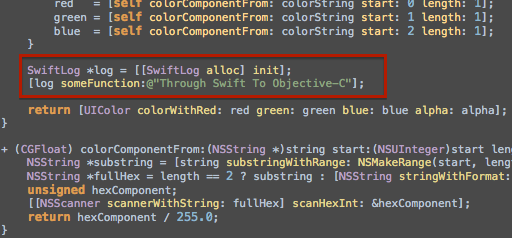
Create Your Custom .swift class, in my case “SwiftLog.swift“ and write your code:

Import Swift files to Objective-C class:
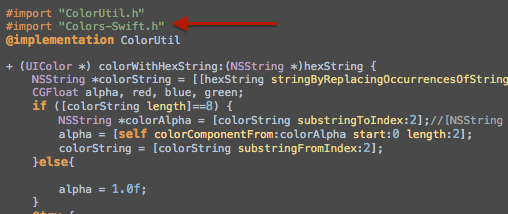
In Swift, Xcode creates file called <#Project Name#>-Swift.h, even if you can’t find or see it, it’s there, this file contains all your Swift classes from your project, once you import it to your Objective-C .m file, your Swift classes will be available for usage:
Working with Data Types
For the most part, Swift offers a convenient and efficient ways to work with Cocoa Data Types. Some Data Types will be converted from Objective-C to Swift, some will be converted from Swift to Objective-C and some can be used as is without being converted. These types are referred to as bridged data types. An Array for example can be passed through a NSArray method , this can be done on the counterpart as well by as or by explicitly providing the type of the constant or the variable.
Strings
Strings will be automatically bridged between the String type and the NSString class, that is to say that you can use the String type anywhere where you used to use the NSString class and gain the benefits of the both. So there is basically no more need for NSString at all. In order to use between String bridging, just import the Foundation framework.
Numbers
Certain native numbers like Int and Float will be automatically bridged to NSNumber and lets you create an NSNumber through a normal initialization:
let n = 42
let m: NSNumber = n
All of the following types are automatically bridged to NSNumber:
- Int
- UInt
- Float
- Double
- Bool
Collection Classes
NSArray and NSDictionary are also automatically bridged to the native Swift Array and Dictionary,and you can therefor use Foundation and Swift collections types interchangeably.
Arrays
The resulting array when bridging between NSArray and Array is [AnyObject].
Which is compatible in both Objective-C and Swift, every object is basically [AnyObject], which means that you can bridge any NSArray object to a Swift Array because all Objective-C object are [AnyObject] compatible. After the bridging it is also possible to downcast the array to a more specific type, But this process is not guaranteed to succeed.
The compiler doesn’t know if the object can be successfully downcasted until it’s in runtime, and that’s why downcasting from [AnyObject] to [SomeType] gives back an optional value.
Dictionaries
The resulting dictionary when bridging between NSDictionary and Dictionary is [NSObject: AnyObject]. Just like with Arrays, bridging between NSDictionary and Dictionary is possible due to the AnyObject compatibility. The Swift compiler replaces the NSDictionary class with [NSObject: AnyObject] when it imports Objective-C APIs, and exactly the other way around when importing Swift to Objective-C. Again, after the bridging, downcasting is possible but may not succeed, and gives an optional value.
Interacting with Objective-C APIs
One important aspect of interoperability is that it lets you work with Objective-C APIs when writing Swift code. After you import an Objective-C framework, you can instantiate classes from it and interact with them using native Swift syntax.
Initialization
Objective-C Class instantiation in Swift is done naturally through the Swift syntax.
Objective-C init methods take the native Swift initializer syntax. All the initializers methods, or in other words, all the methods that start with „init“, get their „init“ prefix sliced off with any Following words, methods like „initWith“ for example get splitted, and sliced off, leaving the method arguments that pass themselves in the same order. This method for example:
UITableView *myTableView = [[UITableView alloc] initWithFrame: CGRectZero style:
UITableViewStyleGrouped];
Will be written in the following way in Swift:
let myTableView : UITableView = UITableView(frame : CGRectZero, style : .Grouped)
You do not have to call alloc as the compiler handles that for you. You can explicitly set the Object, but you don’t have to since you just initialized it with the object’s initializer.
Properties and Methods
Accessing Properties
Access and set properties on Objective-C objects in Swift using dot syntax.
myTextField.textColor = UIColor.darkGrayColor()
myTextField.text = "Hello world"
Working With Methods
When calling Objective-C methods from Swift, use dot syntax. When a method comes over from Objective-C to Swift, it will be changed in the following way: it’s first part, will become the base name of the method, and all the parameters will go inside the parentheses, the first parameter will appear without a name, all the other will appear with their names before the passed argument. This Objective-C method:
[myTableView insertSubview: mySubview atIndex: 2];
Will be written in the following way:
myTableView.insertSubview(mySubview, atIndex: 2)
*Note: methods without parameters still have empty parentheses.
id Compatibility
The Objective-C id protocol Swift equivalent is AnyObject. Just like id, AnyObject protocol allows you to write type-safe Swift code with the flexibility of an untyped object. In other words, in Swift, id is imported as AnyObject. From the same reasons, it is possible to inadvertently write unsafe code, when invoking a method or a property that does not exist on an AnyObject typed object:
var myObject: AnyObject = UITableViewCell()
myObject = NSDate()
myObject.characterAtIndex(5)
The following code compiles without complaint and then causes an unrecognized selector error at runtime due to the fact that myObject doesn’t respond to that method.
In these cases you can take the advantage of optionals in Swift to eliminate this common Objective-C error from your code. Methods called on an AnyObject object behave like an implicitly unwrapped optional:
let myCount = myObject.count?
let myChar = myObject.characterAtIndex?(5)
if let fifthCharacter = myObject.characterAtIndex?(5) {
   println("Found \(fifthCharacter) at index 5")
}
The first and second lines are not executed because the count property and the characterAtIndex: method do not exist on an NSDate object. The myCount constant is inferred to be an optional Int, and is set to nil. You can also use an if–let statement to conditionally unwrap the result of a method that the object may not respond to, as shown on line three.
nil
Unlike in Objective-C, in Swift all value are guaranteed to be non-nil and you wrap the possibly missing type of the value in an optional type. When you need to indicate that a value is missing, you use the value nil. Objective-C on the other hand cannot guarantee that a return object is non-nil, therefore all objects in imported Objective-C APIs return optional types. So before you use an Objective-C object, you should check to ensure that it is not missing.
Extensions
Similar to an Objective-C category, extensions are used to expand the behavior of existing classes, structures, and enumerations, including those defined in Objective-C. Extensions can be defined on both system frameworks or on your own custom types. Properties can be also added in extensions, but they must be computed and cannot be stored to classes , structures, or enumerations. This example extends the CGRect structure to contain a computed area property:
extension CGRect {
   var area: CGFloat {
       return width * height
   }
}
let rect = CGRect(x: 0.0, y: 0.0, width: 10.0, height: 50.0)
let area = rect.area
You cannot use extensions to override existing methods or properties on Objective-C types.
Closures
Closures are also compatible between Swift and Objective-C and will be imported automatically. This code:
void (^completionBlock)(NSData *, NSError *) = ^(NSData *data, NSError *error) {/* ... */}
Will be imported in the following way:
let completionBlock: (NSData, NSError) -> Void = {data, error in /* ... */}
There is only one difference between closures in Swift and in Objective-C and that is that Swift variables are mutable rather than copied. In other words, the behavior of __block in Objective-C is the default behavior for variables in Swift.
What About CocoaPods?
For those of you who don’t know, CocoaPods is one of the more important tools that iOS and OS X developers rely on. At the moment (September 2014) the is no official integration into Swift, but that’s nothing to worry about. Cocoapods can still be used when working with Swift, through Objective-C to Swift integration. After you create your Podfile, add the pods you would like to use, click „pod install“ in the command line and open your .xcworkspace project, the only thing left to do is to add the pods you would like to use in the bridging-header.h file like I showed you earlier, and your favorite libraries will be available!
Some Cocoapods may need some additional configuration in order to work properly.
Conclusions
All of us were relieved to see how simple it actually is to integrate our Objective-C code to our new Swift code. The interoperability between Swift and Objective-C brings comfort as well, and to top it all we still get to use our beloved CocoaPods!
I would say that I am personally rather pleased from the situation, which doesn’t happen very often. Of course the information above is summed in a way that I saw fit, for those of you who need some more information, here is a link to the Apple Docs and a link to from Objective-C to Swift Cocoapods tutorial. Contact our expert iOS app developers if you want to know more or are interested in having your own app developed for the iPhone or other platforms like Android.
Till next time,
Happy Coding! 🙂

Thanks for the good overview of Objective-C/Swift integration!